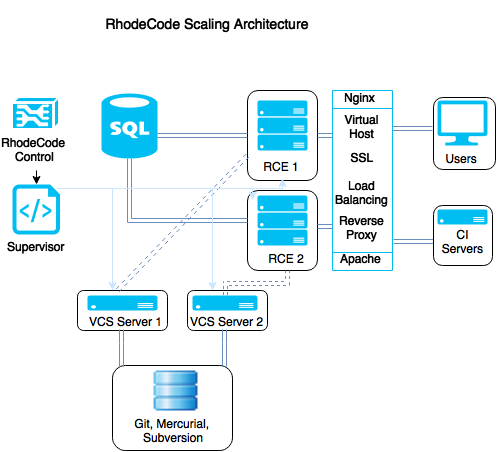
Scaling RhodeCode Enterprise Using Multiple Instances
Running multiple instances of RhodeCode Enterprise from a single database can be used to scale the application for the following deployment setups:
- Using dedicated Continuous Integrations instances.
- Locating instances closer to geographically dispersed development teams.
- Running production and testing instances, or failover instances on a different server.
- Running proxy read-only instances for pull operations.
If you wish to run multiple instances of RhodeCode Enterprise using a single database for settings, use the following instructions to set this up. Before you get onto multiple instances though, you should install RhodeCode Enterprise, and set up your first instance as you see fit. You can see the full instructions here Installing RhodeCode Enterprise
Once you have configured your first instance, you can run additional instances from the same database using the following steps:
Install a new instance of RhodeCode Enterprise, choosing SQLite as the database. It is important to choose SQLite, because this will not overwrite any other database settings you may have.
Once the new instance is installed you need to update the licence token and database connection string in the
/home/user/.rccontrol/instance-id/rhodecode.inifile.
$ rccontrol install Enterprise

 Agree to the licence agreement? [y/N]: y
 Username [admin]: username
 Password (min 6 chars):
 Repeat for confirmation:
 Email: user@example.com
 Respositories location [/home/brian/repos]:
 IP to start the Enterprise server on [127.0.0.1]:
 Port for the Enterprise server to use [10000]:
 Database type - [s]qlite, [m]ysql, [p]ostresql: s
The licence token used on each new instance needs to be the token from your initial instance. This allows multiple instances to run the same licence key.
To get the licence token, go to the RhodeCode Enterprise interface of your primary instance and select . Then update the licence token setting in each new instance’s
rhodecode.inifile.
## generated license token, goto license page in RhodeCode settings to get
## new token
license_token = add-token-here
- Update the database connection string in the
rhodecode.inifile to point to your database. For more information, see Make Database Changes.
#########################################################
### DB CONFIGS - EACH DB WILL HAVE IT'S OWN CONFIG    ###
#########################################################

# Default SQLite config
sqlalchemy.db1.url = sqlite:////home/user/.rccontrol/enterprise-1/rhodecode.db

# Use this example for a PostgreSQL
sqlalchemy.db1.url = postgresql://username:password@localhost/rhodecode
- Restart your updated instance. Once restarted the new instance will read the licence key in the database and will function identically as the original instance.
$ rccontrol restart enterprise-2
If you wish to add additional performance to your setup, see the Tuning RhodeCode Enterprise section.
Scaling Deployment Diagram